Some tips on building your own
1) If you already have an outdoor range with a safe backstop, you're halfway there. If not, lay out a plan using the Range Design section on our website.
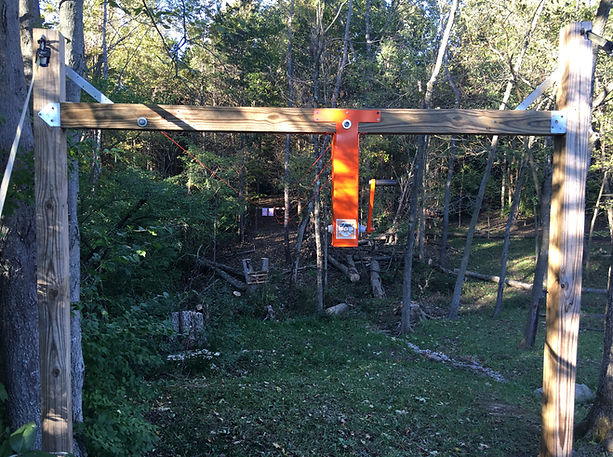
2) The example range shown here is 40 yards and 6' wide with a natural earth backstop.
3) I established my posts at approximately 6' apart with the height at the shooter end of the range at 8' high. This allows me to mow easily between the posts and under the cords. Due to the lay of the land, my target end posts are only 4' out of the ground so that I'm shooting slightly downhill into the earth.


Built by You. Backed by Gophers.
Who needs an installation crew when you’ve got grit, a ladder, and a weekend? Our Gopher Xtreme kits are engineered for do-it-yourselfers who know their way around a toolbox — or at least aren’t afraid to learn. With simple tools, clear instructions, and everything you need to get up and running fast, you’ll have targets running up and down your range in no time. No power required. No contractors needed. Just you, your land, and the best build-your-own target system out there.
DIY - OUTDOOR TARGET RETRIEVAL SYSTEM
Some tips on building your own (continued)
4) Once you've established your post locations, drill holes in the earth below the frostline for your area and install your posts at the shooter end of your range. If you have rocky, sandy or other soils conditions - you'll have to adjust your post installation methods per local construction standards and codes.
5) Level your posts and add quick concrete mix and water (per instructions on bag).
6) Using a level and compass, sight in the location for your target-end posts and install them.
7) Cut and install the 4x4 cross beam using standard mounting hardware from your local hardware store.


Some tips on building your own (continued)
8) Measure and layout the eyebolt lags and return pulley on the target-end cross beam and install all components.
9) Measure and layout the shooter-end components and install them on the cross beam. Line up the transmission with your measured line, grip and mark a circle to drill for your eyebolt.
10) Drill and insert your eyebolt, then set the bottom screws to be sure your transmission bracket is tight to the bottom of the 4x4 cross beam.


Some tips on building your own (continued)
11) Be sure all your stakes and tie down straps are secured and lightly tensioned from the upright posts (after concrete is dry). Don't over tighten straps as final tensioning will occur after the installation is complete.
12) At the shooter-end, assemble the target shuttle and temporarily attach it to the cross beam. You may not need to do this if you have an assistant. Tie off the cord to the eye bolts, thread through the shuttle pulley and stretch the left and right static lines to the target end eye bolts and tie off to each cleat. Don't tension at this time.
13. Now thread the eyelet on the right shuttle, wrap it around the double pulley (adjacent to the belt drive), and tie the end of the cord off the the target shuttle. Extend the cord down range, around the target-end pulley and back to the target-end. Lightly tension and tie the end of the cord off to the other end of the target shuttle. This is your drive system.


Some tips on building your own (continued)
14) Once all lines are properly installed, you should be able to crank the target shuttle. You may need to lightly adjust the tension to make it move smoothly.
15) Now run the target to the center of your range. This will be your worst case scenario regarding line sag in your system. This is the time to tension your ratchet straps and cords for the best optimization of your system.
16. After performing any final tensioning, you can take up the spare cord using the cleats you installed at the target-end and the ones on the shuttle cart (as shown).


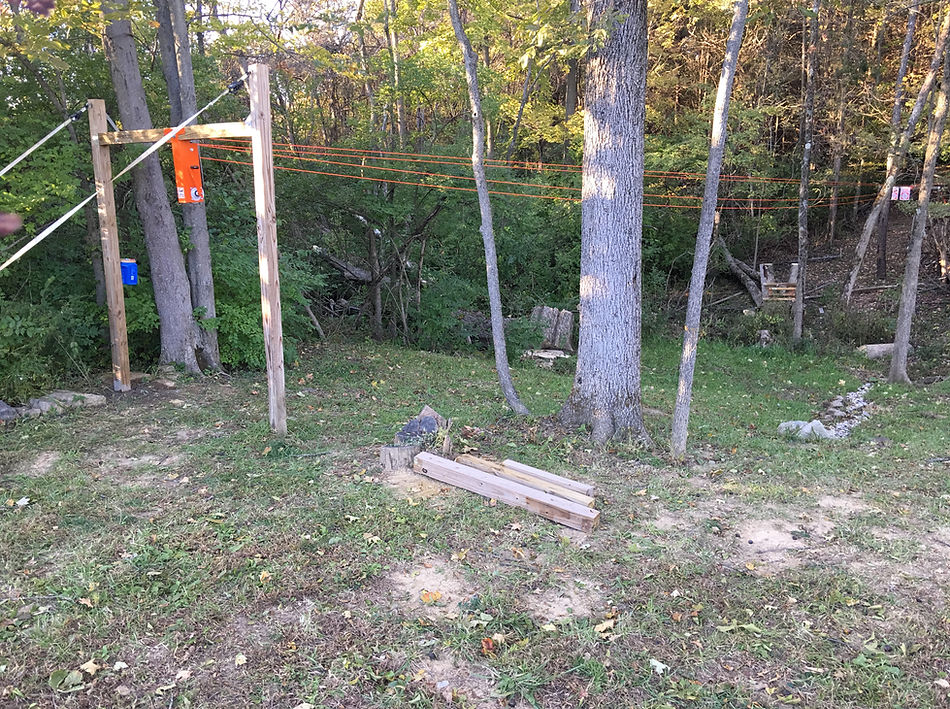
Your finished installation should look something like this